1、导入数据库
数据库文件 resource/data/gfast-v32.sql 导入到生产服务器MySQL数据库。
2、打包后端服务
注意若需跨平台编译请参照如下配置:
a. Mac 下编译 Linux 和 Windows 64位可执行程序
# 编译linux
CGO_ENABLED=0
GOOS=linux
GOARCH=amd64

# 编译windows64
CGO_ENABLED=0
GOOS=windows
GOARCH=amd64
b. Linux 下编译 Mac 和 Windows 64位可执行程序
# 编译mac
CGO_ENABLED=0
GOOS=darwin
GOARCH=amd64

# 编译windows64
CGO_ENABLED=0
GOOS=windows
GOARCH=amd64
c. Windows 下编译 Mac 和 Linux 64位可执行程序
 # 编译Mac
 SET CGO_ENABLED=0
 SET GOOS=darwin
 SET GOARCH=amd64
 go build main.go


 编译 linux
 SET CGO_ENABLED=0
 SET GOOS=linux
 SET GOARCH=amd64
 go build main.go
进入到项目根目录
# 如需要把可执行文件打包为名称是gfast-app的文件
go build -o gfast-app ./main.go
会在项目根目录生成gfast-app文件。
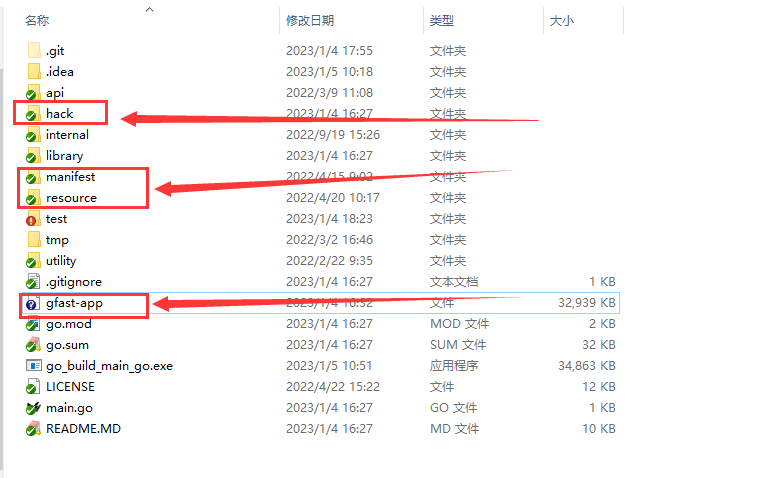
将配置文件、资源文件、执行文件、模板文件一同上传至服务器。
如图将以上文件及目录上传至服务器即可。
3. 修改配置文件、配置数据库、缓存模式、日志
server:
  address:     ":8199"
  serverRoot: "/www/xxxxxxxxxx/gfast-app/resource/public"
  dumpRouterMap: false
  routeOverWrite: true
  openapiPath: "/api.json"
  swaggerPath: "/swagger"
  NameToUriType: 3
  maxHeaderBytes: "20KB"
  clientMaxBodySize: "50MB"
  # Logging配置
  logPath: "/www/xxxxxxxxxx/gfast-app/resource/log/server"                 # 日志文件存储目录路径,建议使用绝对路径。默认为空,表示关闭
  logStdout: true               # 日志是否输出到终端。默认为true
  errorStack: true               # 当Server捕获到异常时是否记录堆栈信息到日志中。默认为true
  errorLogEnabled: true               # 是否记录异常日志信息到日志中。默认为true
  errorLogPattern: "error-{Ymd}.log"  # 异常错误日志文件格式。默认为"error-{Ymd}.log"
  accessLogEnabled: true              # 是否记录访问日志。默认为false
  accessLogPattern: "access-{Ymd}.log" # 访问日志文件格式。默认为"access-{Ymd}.log"

logger:
  path: "/www/xxxxxxxxxx/gfast-app/resource/log/run"
  file: "{Y-m-d}.log"
  level: "all"
  stdout: true

# Database.
database:
  logger:
    level:   "all"
    stdout:  true
    Path: "/www/xxxxxxxxxx/gfast-app/resource/log/sql"

  default:
    link:   "mysql:gfast3:gfast333@tcp(192.168.31.212:3306)/gfast-v32?charset=utf8mb4&parseTime=true&loc=Local"
    debug:  true
    charset: "utf8mb4" #数据库编码
    dryRun: false #空跑
    maxIdle: 10 #连接池最大闲置的连接数
    maxOpen: 10 #连接池最大打开的连接数
    maxLifetime: "30s" #(单位秒)连接对象可重复使用的时间长度

gfToken:
  cacheKey: "gfToken:"
  timeOut: 10800
  maxRefresh: 5400
  multiLogin: true
  encryptKey: "49c54195e750b04e74a8429b17896586"
  cacheModel: "redis"
  excludePaths:
    - "/api/v1/system/login"

# Redis 配置示例
redis:
  # 单实例配置
  default:
    address: 127.0.0.1:6379
    db: 1
    idleTimeout: "60s" #连接最大空闲时间,使用时间字符串例如30s/1m/1d
    maxConnLifetime: "90s" #连接最长存活时间,使用时间字符串例如30s/1m/1d
    waitTimeout: "60s" #等待连接池连接的超时时间,使用时间字符串例如30s/1m/1d
    dialTimeout: "30s" #TCP连接的超时时间,使用时间字符串例如30s/1m/1d
    readTimeout: "30s" #TCP的Read操作超时时间,使用时间字符串例如30s/1m/1d
    writeTimeout: "30s" #TCP的Write操作超时时间,使用时间字符串例如30s/1m/1d
    maxActive: 100

system:
  notCheckAuthAdminIds: [1,2,31]  #无需验证后台权限的用户id
  dataDir: "/www/xxxxxxxxxx/gfast-app/resource/data"
  cache:
    model: "redis"  #缓存模式 memory OR redis
    prefix: "gFastV3Cache:" #缓存前缀

#casbin配置
casbin:
  modelFile: "/www/xxxxxxxxxx/gfast-app/resource/casbin/rbac_model.conf"
  policyFile: "/www/xxxxxxxxxx/gfast-app/resource/casbin/rbac_policy.csv"

# 上传配置
upload:
  default: 0   # 默认上传至本地
  tencentCOS:
    upPath : "/gfast/"
    rawUrl :    "https://xxxxxx.ap-xxxxx.myqcloud.com"
    secretID :  "xxxxxxxxxx"
    secretKey : "xxxxxxxxxx"

# 代码生成配置
gen:
  author: "gfast"
  moduleName: "system"
  apiName: "api/v1"
  packageName: "internal/app/system"
  goModName: "github.com/tiger1103/gfast/v3"
  autoRemovePre: true   #是否自动删除表前缀
  tablePrefix: "table_,qxkj_"   #表前缀
  templatePath: "/www/xxxxxxxxxx/gfast-app/resource/template/vm"  #代码生成模板路径
  frontDir: "../../../project/webProject/p2022/gfast-v3.2-ui/gfast3.2-ui" #前端路径
注意以上所有路径相关地方最好都使用根路径,使用相对路径可能因为不同模式启动项目服务造成路径不匹配,无法正确加载。
4.启动后端服务
4.1 nohup
我们可以使用简单的nohup命令来运行应用程序,使其作为后台守护进程运行,即使远程连接的SSH断开也不会影响程序的执行。在流行的Linux发行版中往往都默认安装好了nohup命令工具。 命令如下:
nohup /www/xxxxxx/gfast-app/gfast-app &4.2 tmux
tmux是一款Linux下的终端复用工具,可以开启不同的终端窗口来将应用程序作为后台守护进程执行,即使远程连接的SSH断开也不会影响程序的执行。 在ubuntu系统下直接使用sudo apt-get install tmux安装即可。使用以下步骤将应用程序后台运行。
- tmux new -s gfast-app;
- 在新终端窗口中执行./gfast-app即可;
- 使用ctrl + B & D快捷键可以退出当前终端窗口;
- 使用tmux attach -t gfast-app可进入到之前的终端窗口;
4.3 systemctl
Systemd 是 Linux 系统工具,用来启动守护进程,已成为大多数发行版的标准配置。
而 systemctl 是 Systemd 的主命令,用于管理系统。可以参考 阮一峰对于 Systemd 的解读 ,文章的第四、五章节。
其实我们大部分服务都有使用 systemctl 管理,比如 MySQL、Nginx 等等。
常见配置如下:
[Unit]
# 单元描述
Description=GFAST APP
# 在什么服务启动之后再执行本程序
After=mysql.service

[Service]
Type=simple
# 程序执行的目录
WorkingDirectory=/www/xxxxxx/gfast-app
# 启动的脚本命令
ExecStart=/www/xxxxxx/gfast-app/gfast-app
# 重启条件
Restart=always
# 几秒后重启
RestartSec=5

[Install]
WantedBy=multi-user.target
使用方法:
创建应用配置文件 /etc/systemd/system/gfapp.service, 内容如上;
使用 systemctl daemon-reload 重新加载服务;
执行 systemctl start gfapp 来启动服务;
最后执行 systemctl status gfapp 来查看服务运行的状态信息;
执行 systemctl enable gfapp 将服务添加到开机启动项;
注意:执行的 gfapp 是使用文件名作为服务名;
常见的命令有: start(启动), stop(停止), restart(重启), status(查看运行状态), enable(添加到开机启动项), disable(将程序从开机启动中移除)
4.4 screen
Screen 是一款由 GNU 计划开发的用于命令行终端切换的自由软件。用户可以通过该软件同时连接多个本地或远程的命令行会话,并在其间自由切换。GNU Screen可以看作是窗口管理器的命令行界面版本。它提供了统一的管理多个会话的界面和相应的功能。
安装方式:
sudo apt install -y screen (debian 系列)
sudo yum install -y screen (centos)
常用参数:screen -S yourname -> 新建一个叫 yourname 的 session
screen -ls -> 列出当前所有的 session
screen -r yourname -> 回到 yourname 这个 session
screen -d yourname -> 远程detach某个 session
screen -d -r yourname -> 结束当前 session 并回到 yourname 这个 session
使用方法:
- 使用命令 screen -S gfapp 创建一个 session;
- 在新终端窗口中执行 ./gf-app 即可;
- 执行 ctrl-a, ctrl-d 暂时离开当前session;
- 执行 screen -r gfapp 返回命令窗口; 若返回不成功, 可能是该窗口被占用(Attached)了, 可以尝试使用 screen -Dr gfapp;
- 执行 screen -X -S gfapp quit 结束程序;
5.打包部署后台前端UI
前端UI可以打包后直接使用nginx来作为静态文件处理,也可以使用Golang WebServer作为前端服务直接处理静态文件请求。
5.1 打包前端UI
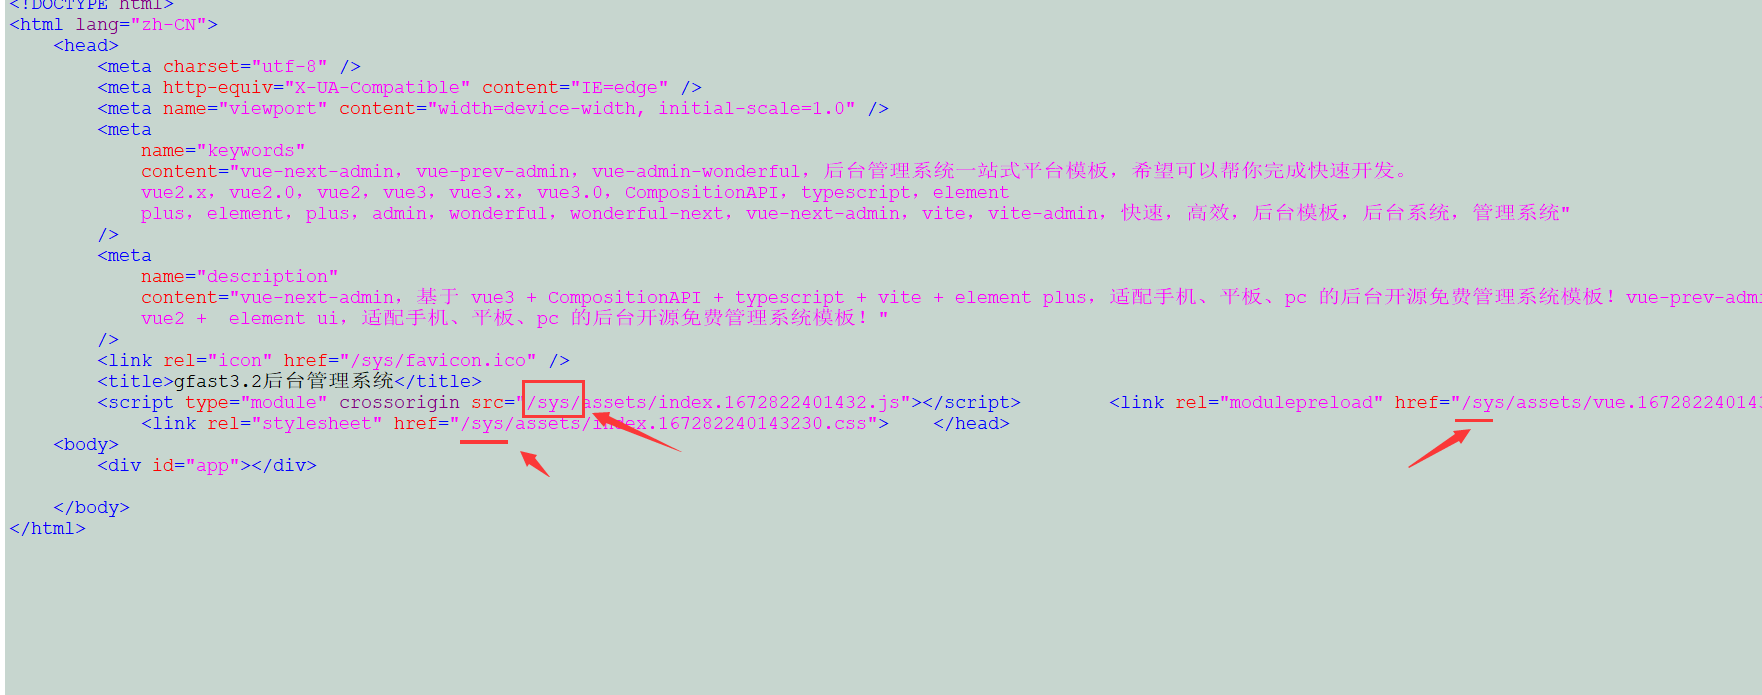
首先确认后台UI访问路径,例如后台访问路径是:https://xxx.com/sys则需要修改配置如下:.env.production文件中:
# 线上环境
ENV = 'production'

# public path 配置线上环境路径(打包)、本地通过 http-server 访问时,请置空即可
VITE_PUBLIC_PATH = '/sys/'

# 线上环境接口地址,根据自己的实际情况配置
VITE_API_URL = '/'
修改完配置后在前端项目路径下执行打包命令:
npm run build则会在:./dist/目录中生成前端UI静态文件,将该目录下的静态文件上传至服务器即可。
查看对应资源文件发现会添加sys路径:

5.2 使用golang webServer作为前端服务处理
只需要将前端打包生成的静态文件上传至:/www/xxxxxx/gfast-app/resource/public/sys/目录即可。访问后台直接:https://xxx.com/sys/
5.3 使用nginx代理部署
代理部署即前置一层第三方的WebServer服务器处理所有的请求,将部分请求(往往是动态处理请求)有选择性地转交给后端的Golang应用程序执行,后端部署的Golang应用程序可以配置有多个。这种模式常用在复杂的WebServer配置中,常见的场景例如:需要静态文件分离、需要配置多个域名及证书、需要自建负载均衡层,等等。
静态文件后缀
这种方式通过文件名后缀区分,将指定的静态文件转交给nginx处理,其他的请求转交给golang应用。 配置示例如下:
server {
    listen       80;
    server_name  xxxx.com;
    index index.html index.htm default.htm default.html;
    root /www/xxxxxx/gfast-app/resource/public;
    access_log   /xxx/log/gfast-app-access.log;
    error_log    /xxx/log/gfast-app-error.log;

    # 注意此处代理和前端接口地址一致VITE_API_URL = '/'
    location / {
        proxy_pass http://127.0.0.1:8199;
        proxy_set_header Host $host;
        proxy_set_header X-Real-IP $remote_addr;
        proxy_set_header X-Forwarded-For $proxy_add_x_forwarded_for;
        proxy_set_header REMOTE-HOST $remote_addr;

        add_header X-Cache $upstream_cache_status;

        #Set Nginx Cache

        add_header Cache-Control no-cache;
        proxy_set_header Upgrade $http_upgrade;
        proxy_set_header Connection "upgrade";
    }
}
其中,8199为本地的golang应用WebServer监听端口。
例如,在该配置下,我们可以通过http://xxxx.com/my.png 访问到指定的静态文件。
静态文件目录
在5.2章节中使用了golang webserver来处理静态资源,也可以直接使用nginx来处理,
这种方式通过文件目录区分,将指定目录的访问请求转交给nginx处理,其他的请求转交给golang应用,可以把前端打包好的静态文件sys目录放在其他目录,不需要放在后端的resource/public目录下,例如放在和/www/xxxxxx/gfast-app同级目录下。 配置示例如下:
server {
    listen       80;
    server_name  xxx.com;
    index index.html index.htm default.htm default.html;
    root /www/xxxxxx/gfast-app;
    access_log   /xxx/log/gf-app-access.log;
    error_log    /xxx/log/gf-app-error.log;

    location ^~ /sys {
        access_log off;
        expires    1d;
        root       /www/xxxxxx/gfast-app/sys;
        try_files  $uri $uri/resource/public/;
    }

    # 注意此处代理和前端接口地址一致例如VITE_API_URL = '/apix/'
    location /apix/ {
        proxy_pass                 http://127.0.0.1:8199/;
        proxy_redirect             off;
        proxy_set_header           Host             $host;
        proxy_set_header           X-Real-IP        $remote_addr;
        proxy_set_header           X-Forwarded-For  $proxy_add_x_forwarded_for;
        add_header Cache-Control no-cache;
        proxy_set_header Upgrade $http_upgrade;
        proxy_set_header Connection "upgrade";
        client_max_body_size 800m;
    }
}
其中,8199为本地的golang应用WebServer监听端口。
例如,在该配置下,我们可以通过http://xxx.com/sys/ 访问后台。
最后编辑:管理员 更新时间:2025-01-22 11:13
